
Crimson Feature of the Month: People Profile Basics

The People Profile is an integral part of the Crimson platform. For the rest of the year, the Feature of the Blog posts will focus on different aspects of People Profiles each month. In August, we’ll start off the series with People Profile Basics.
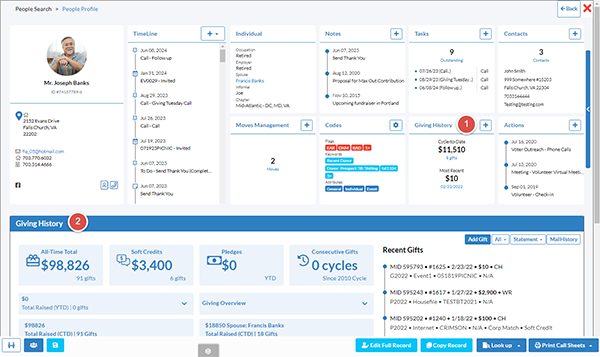
Parts of the People Profile
The People Profile in Crimson segments data into separate panels and includes summary information in each. When a panel is selected, the lower half of the profile shows an expanded version of those details. For example, when the Giving History panel is selected, giving history details about the donor will appear on the bottom of the profile.
• People Profile Panels
While the Contact Information and Timeline panels cannot be moved, the rest of these can be dragged-and-dropped into your preferred location or deleted from your customizable profile settings. The number of panels displayed will depend on how you customize your settings and the size of your screen. If you want to access additional panels that aren’t displaying, click on the blue bar on the right.

• Possible Profile Panels
Profile Information
Timeline
Individual
Notes
History
Tasks
Contacts
Moves Management
Events
Codes
Giving History
Actions
Pledge
Club
Bundler Tracking
Electronic Fund Transfer
Conduit
Outside Gifts
• Profile Information Panel
This panel contains all donor contact information for the person.

a. Profile photo: hover over this photo to change it.
b. PID: this is your personal identification number that is assigned to ever record in Crimson.
c. Home address: click on the blue place marker icon to open Google Maps.
d. Email & Phone numbers: additional email addresses & phone numbers can be saved with this record.
e. Social media: any social media profiles associated with the record will be displayed here. Crimson will also append some social media profiles with your data when creating People Profiles and pull profile photos.
f: Address book: Click on this icon to open a list of the addresses associated with the record, including additional residences or work addresses. You can also add additional addresses here.
g. Phone Book: Click on this icon to open all the phone numbers associated with this record. You can also add additional phone numbers here.
• Individual/Organization Panel
This box will change depending on the type of People Profile and will display different fields, such as Type of Organization, FEC ID, or Cash on Hand.
The Individual Panel contains occupation and employer information as well as nicknames and chapter information. If a spouse has a profile, their name will be linked in blue.

• Contact Panel
This panel lists all the contacts associated with this People Profile. The first contact listed will be the contact selected as primary displayed in the box. Contacts could be co-workers, assistants, or anyone who needs to be connected to this people record.

• Tasks Panel
The Tasks Panel shows the three most outstanding Tasks connected to this People Profile, the date they were assigned, and the purpose of the Task. When you click on this panel, an expanded Tasks Panel will open below, or you can click on the + sign to add a new Task. For directions on how to create, edit, or manage Tasks, click here for the recent Feature of the Month post.

• Notes Panel
The Notes Panel displays the three most current notes. If you click the panel, it the Notes will expand below. You can also click on the + button to add a new note. For directions on how to add a new Note, please read the Helpdesk Guide.

How to Edit People Profiles
1. Click on the Individual or Organization panels to edit most of the record. The information displayed will depend on the People Type selected with the record was created.

2. Add or edit the fields needed.

3. Click on the blue Save button.
Customize People Profiles
While the Contact Information and Timeline panels can’t be moved, the rest of the People Profile is completely customizable. It’s easy to drag-and-drop, delete boxes, and add boxes from the default settings.
Scroll to the bottom of the page and click on the edit button to activate the customize feature. When you hover over each card or graph, you can either drag-and-drop each element into a new location or remove them entirely. Once the page is arranged, click on the blue checkmark button to save. Keep reading for detailed directions on how to customize People Profiles. The same steps also apply to customizing the layout of the individual users’ home dashboard.

If you need additional directions, click here for the Feature of the Month Customizable Profile post.